I've been doing some experimenting with different ideas I've found across the web and developed a method of building ships in bottles in very small scales. I highly suggest visiting Eddy's Thimble SIB Pier and David Lavoie's Website for information and to see more incredibly small ships in bottles.
Let's start with the bottle.

This is a one inch vile I got from Michael's. It came in a pack with several other vials. Measuring the bottle is important at all scales but most importantly at this one since there's not a lot of space to work with. Tall ships are generally as tall as the are long. This bottle gives plenty of length in comparison to height so height is important as it also gives about what the length of the ship should be. To measure it I use one of the most important tools for this scale a paint brush.

Sounds weird but this paint brush solved a lot of the problems I had when it came to this scale. First of all measurement. I cut off a bristle and used it to measure the inside. Cutting it down carefully until it just touched both sides. The ship can be no taller than a half inch.

I also measured the bottle neck to see how much width I had.

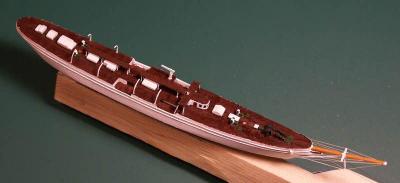
Now that I knew I had to build a ship with in a half inch by a quarter inch I was ready to start carving. There's all sorts of carving methods the only real important one here is to carve the ship on a long piece of wood so that it can be handled through out the build. I chose a Bermuda sloop to build because of it's relatively simple design.


Once the ship is carved I worked on the bulwarks. I made these out of paper stained with a wood stain. I carefully cut them to size and glued them on the side of the ship. I then glue on black thread to act as the channels and a small piece of wood for the stem. I coated the ship in two coats of clear nail polish to stiffen the paper.


I drilled through the bulwarks with a small drill and used 30 gauge wire for cannons. At this scale it's sometimes difficult to decide what to add and what not to. In one version of this ship I added cut out in the bulwarks. For the most part they were to hard to see so I opted for just drilling into the bulwarks. I've also added gun carriages in one version but not others. At this scale so much is hard to see I try to pay more attention to the sails rigging and overall hull then the finer details.

From here I go back to the paint brush. Cutting off more bristles I made the masts and yards. The importance of the bristles is that the bend easily with out breaking. They can easily go into the bottle and pop back up once they are completely in. I managed to get different thickness's by gluing two to four bristles together. Also gluing them in different spots I was able to add the different portions of the mast. I drilled a small hole and glued the mast to the hole. As mentioned the bristles bend easily to no hinges are needed.

Some experiments went into the bow. In one version I used a needle painted black. In another I used bamboo carved very thin. I have found that the bristles work just as well. I then used 0/8 fly tying thread for the rigging. I tied the back stays to the mast and glued them to the channels. Chain plates would be to small for this build. I put on two back stays on. I contemplated putting on ratlines but I'm not sure how I could make it work with out them seeming too over sized.

The fore stays I hardened with super glue so they stay straight. I then cut them to size before going into the bottle. Normally I would use the fore stays to pull the masts up but in this case the mast pop up automatically and the opening is to small for knives or scissors to cut anything.

From here I used light brown thread for the running lines. This is the best photo I have of those.

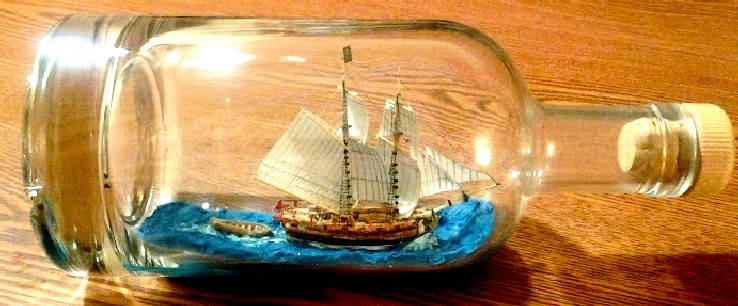
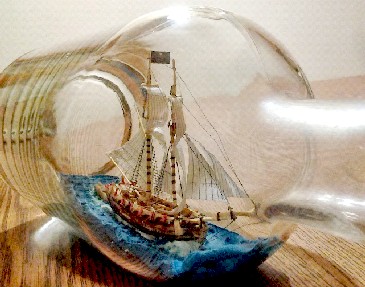
I used tissue paper for the sails and drew on the details. Here's a couple photos of finished ships ready to bottle.


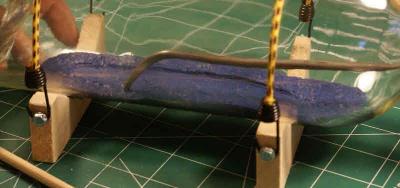
At this point the ship is cut off from the rest of the wood and is ready to go into the bottle. As usual I use Plasticine clay for the sea. A couple seconds over a hot burner makes it stick well to the glass. I put the ship in and then bottle and glue it to the sea. I then glue the fore stays to the bow.

I then cork the bottle and add a stand and other details. Below is all the various versions of this build. It goes pretty quick and makes a great gift.


That's all for now. Thanks for reading.